Published in The Phoenix, 7/2012
During the hot summer months, thoughts of the great war to the north come quickly to the minds of some. To others, it leaves great opportunities to plunder freely without having to worry about knights running after you, or arrows hitting your backside. It’s free reign on all goods not nailed down, so there is plunder aplenty for all that are interested!
Several gentles have brought up comments in the past several months about hiding those naughty mundane things when you’re sitting beside the field. Items like coolers, chairs, and day shades are commonly seen as “detracting” from the grandeur of the period gear that some gentles are fortunate enough to possess. Since most of the high quality period gear will be making its way up north with its owners, it’s difficult to lay claim to the already owned items. It is, however, just as easy to secure your own gear with a bit of personal flair!
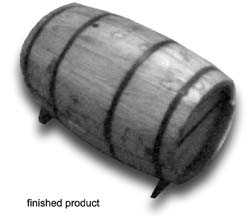
Last year at about this time, I ran into the question of how to make a modern cooler look period. Being that it would take quite a bit of effort to transform a modern cooler into something that looked period, I looked for alternative means. The following are the measures that we underwent to create a semi-period looking barrel cooler that has brought us quite a few compliments beside the field.
Finding the plunder – My lady and I knew that all of the materials we needed were found in the same place. We went to the local K-Mart and found two planters that were half-barrel shaped, banded with metal in the garden section. We then got a tube of roofing tar and a standard caulking gun for the tube of tar to work with, along with a can of polyurethane, from the hardware section. We also needed a hinge, so we got one from the house wares department.
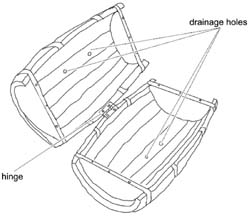
Fixing the barrel – There were two small drainage holes in each half of the barrel. To correct this, I took a dowel rod and sanded it down until it fit each hole snugly. I then cut the dowel in slices that were about the same thickness of the wood that was used in the barrel. Using carpenter’s wood glue, I plugged the holes with my bits of dowel and let it set for a little while.
Sealing the barrel – Ice melts, no matter how cold your cooler can stay. To prevent the barrels from leaking too badly, we first generously sealed each of the cracks. Since the spaces were quite wide, we had to put on several layers of the tar. After the tar had dried, we put on several coats of the polyurethane over it. This made for a good failsafe to make sure that the water wasn’t going to just soak through the wood.
Putting the barrel together – Once all of the sealers had thoroughly set (I recommend at least 24 hours), we were ready to put the barrel together. We placed our hinges about 10” apart along one side of the barrel. Since the hinges are straight, but the wood is curved, the hinges will not sit completely flush. Once the hinges are on both sides of the barrel, you can smack it a couple of times with a rubber mallet to get a tighter fit if desired. I personally decided that I didn’t mind ¼” of the hinge showing on the outside of the barrel, so I left it alone.
The end result of the project was a hinged barrel that was fairly well insulated, and didn’t leak much. I will admit that the barrel is not as dependable as a modern cooler. I’ve found that a bag of ice will last for about 4-5 hours in the August sun before it completely melts. However, compared to the 10 hours that our modern cooler takes to let a bag of ice melt, it’s not too shabby. The bottom line is that it looks more period than a cooler, and is great for keeping your Gatorade cool beside the field.
Total project time: 1 hour (including time for glue, tar, and polyurethane to set: 24 hours)
Degree of difficulty: 2 out of 10
Until next, may the seas be bountiful and your sails stay full of wind!

