Based on 15th century Italian Reliquary Cases/Boxes
For this competition, I wanted to create something that pushed both my knowledge and current skill set beyond both my normal way of doing things and my comfort zone. I’ve created leather cases in the past utilizing more modern techniques that involve box stitching, but am not as familiar with utilizing only glue and molding the leather. I’ve often reviewed reliquary cases within the Met and British Museums for inspiration, and felt that it was time that I attempt to recreate something that held a closer base to period.
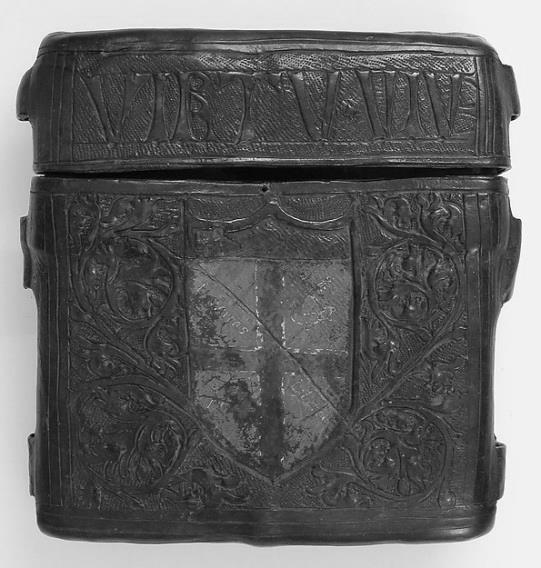
This particular type of box is rather complex in its simplicity. It’s also lacking in documentation from the makers themselves, and the original techniques appear to have died off around the middle of the mid-16th century, though other mediums did persist that were utilized during the same time frame. Nonetheless, I’m referencing the intricacy of the molded leather case as was present during the 16th Century in Italy.
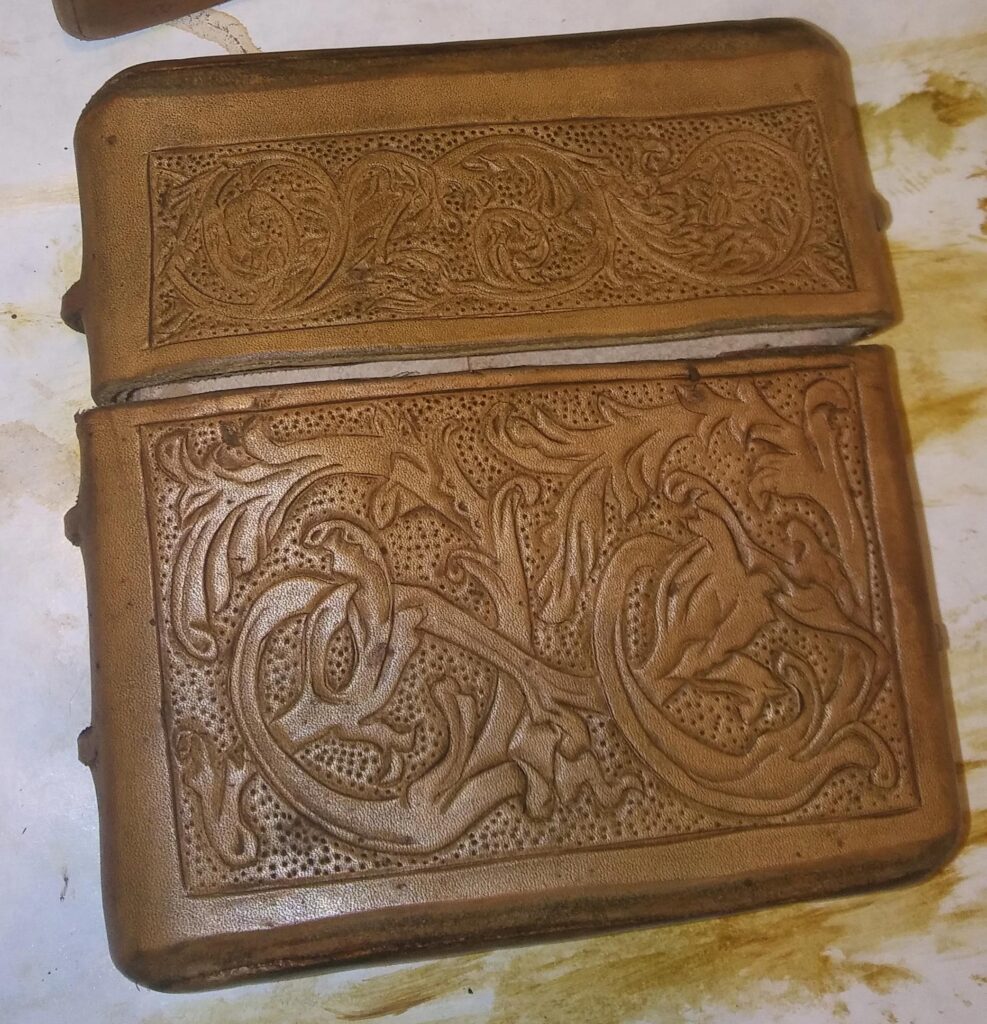
The cases that the Italians created were made with molded leather which was then intricately decorated after they had been hand-formed. The distinctive patterns of scrollwork (filigree) could be often found on the cases, but the most technically precise feature, in my opinion, was the ability to mask the seams of the cases so that they virtually disappear into the design work. The extant cases feature visually softened edges, and have been at least semi-hardened and sealed in order to protect their contents, extremely important in the use of a reliquary case where the contents would have been copies of Biblical passages.
Differences from Modern Cases
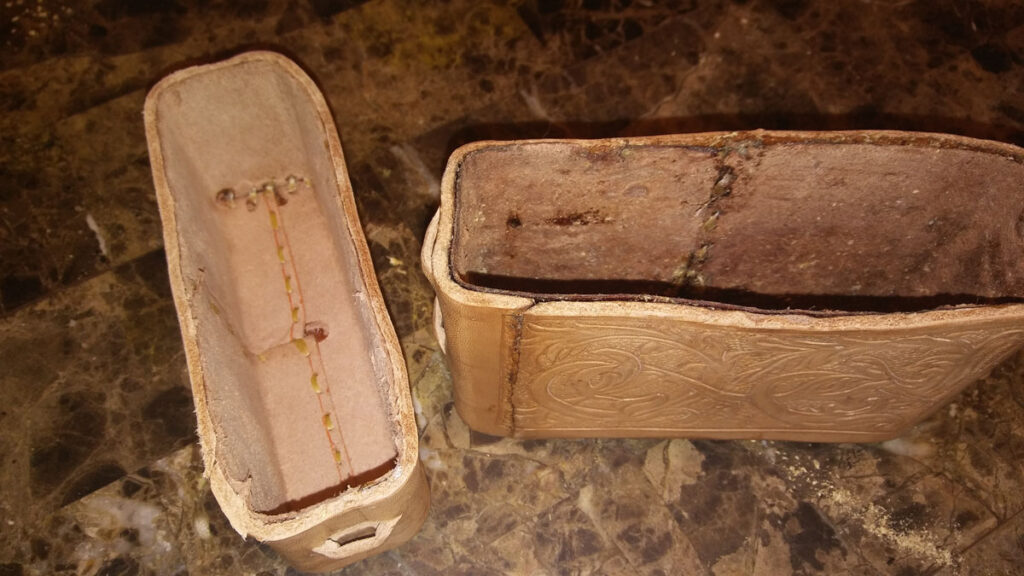
The most obvious difference between these cases in period and those in modern times would be the absence of stitching. Most modern boxes and cases feature a box stitching technique, where the stitching of the edges of a case can be sewn together in a “box stitch” to reinforce the seams. Due to the stitching, modern cases can go completely unlined and feature overlapping or hinged closure. These cases must be formed and glued over an initial liner layer, and appear constructed in a single piece, then cut from the mold itself. The loops on the sides would have held a cord so that the case could be hung around the neck or from a belt, and would slide open along the cord so that the lid would completely separate from the main body of the box. An interior liner would serve to give an overlapping element for the lid of the box to slide over, in order to both protect the seam/opening and to reduce shifting during the movement of the person that was carrying it.
Assumptions and Interpretations
Where one of the basic assumptions in modern leather working is that you first do tooling and then assemble your piece, these particular cases appear to have been generally accepted to have been tooled directly on the mold. During the molding process, any of the intricate tooling patterns would have been presumably lost, since you have to significantly soak the leather to get its form to hold, particularly around the edges and corners. Lines that are marked into the leather certainly appear to have been made in parallel to existing seams, so we do not know for sure whether these assumptions are correct. I’ve worked under the assumption (in this piece) that they are correct.The Crafting Process
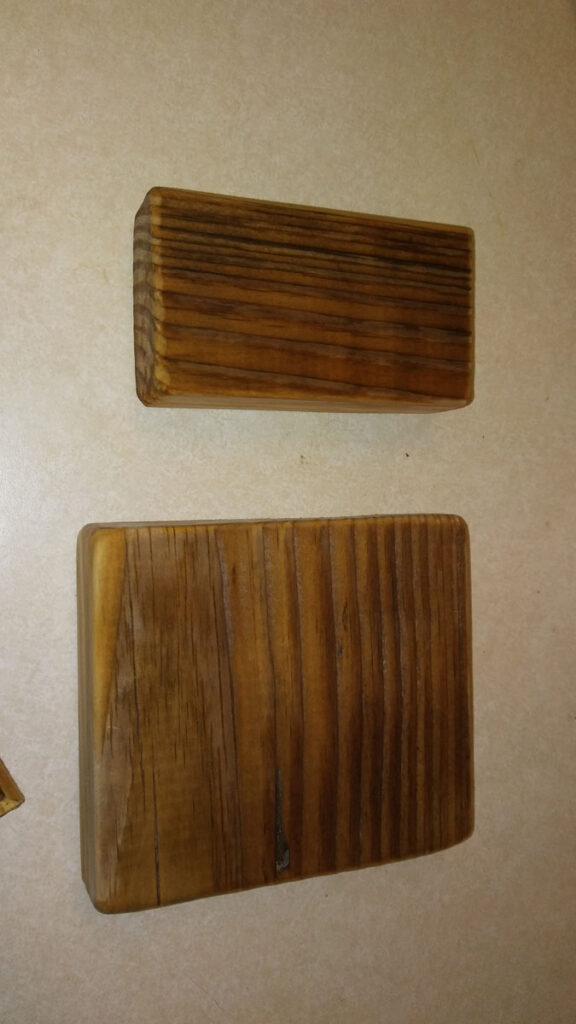
To begin, I created a form to mold on from a piece of treated pine that I had in the shop. I checked the dimensions of the extant piece to get it cut to roughly the same size, then sanded down the block to remove the hard edges and the corners. I then created the first of the two liners from a piece of split cowhide to match the form and stitched it directly on the block itself, creating a base to glue the shell to during the molding process.
The liner was dampened somewhat while stitching, allowing the liner to shrink over the form in order to get as tight a fit possible. I then went back with a peening hammer and flattened out the seams and corners in order to maintain the rounded edges of the top and bottom and close the holes as much as possible around the stiches.
Once the liner was dried onto the form, I then cut a top and bottom for the case from veg tanned leather in a basic rounded rectangle shape. I skived the edges down somewhat in order to shape a softer angle into it so that the glue had more surface area to attach to the body of the case. The top and bottom were then wet down in warm water and hand molded onto the lined form. Some gentle tapping with the the peening hammer eased the corners into a more dense curve to the pieces, as well as to compress the leather to harden it somewhat. The pieces were then left to dry onto the mold, where the additional shrinkage lent additional hardening. Once dry, the pieces were glued in place.
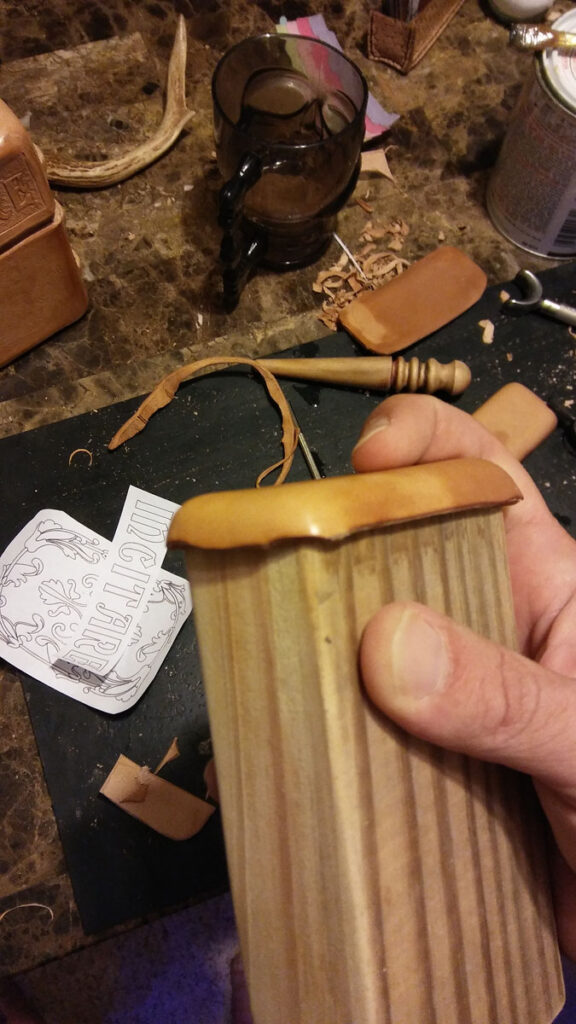
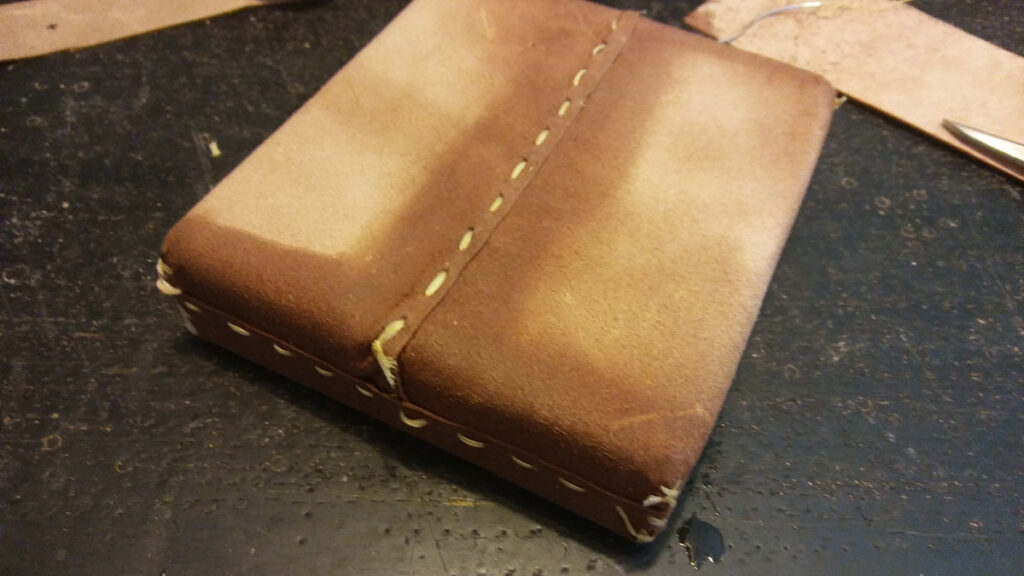
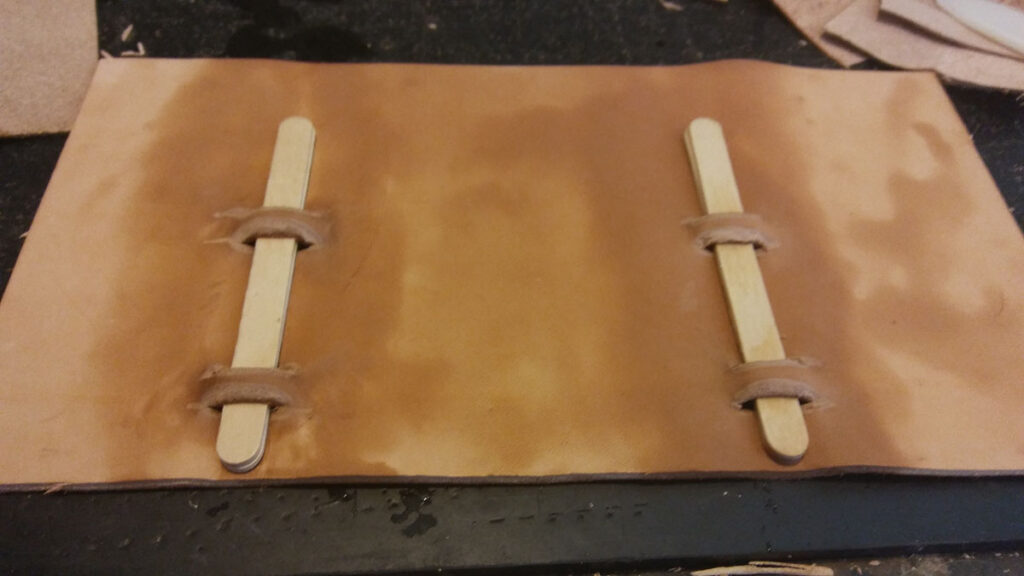
I decided to use a single piece of veg tanned leather for the central body of the case and laid out the body so that the edge would run parallel to the corner on one of the faces, as was done for the extant pieces in order to get measurements. By moving the form over the leather, I marked out where the edges would line up and skived the top and bottom edges down until I got a good fit against the glued on top and bottom pieces. I then skived in lines along where the hard edges of the form’s sides so that it would wrap around the form a little more easily. I marked off the places for loops as well on the short sides, cut them and skived/beveled the edges there as well – inserting pieces of popsicle sticks through the loops so that the leather could shrink over them to harden.
Once the loops had been reinforced, I began to glue the body of the case onto the form. I had to be particularly mindful of where the seams lined up, and used rubber bands to hold the leather onto the form. When the glue had come toward the end of the set time, I started tapping down the seams and edges with the peening hammer to get a more firm fitment.
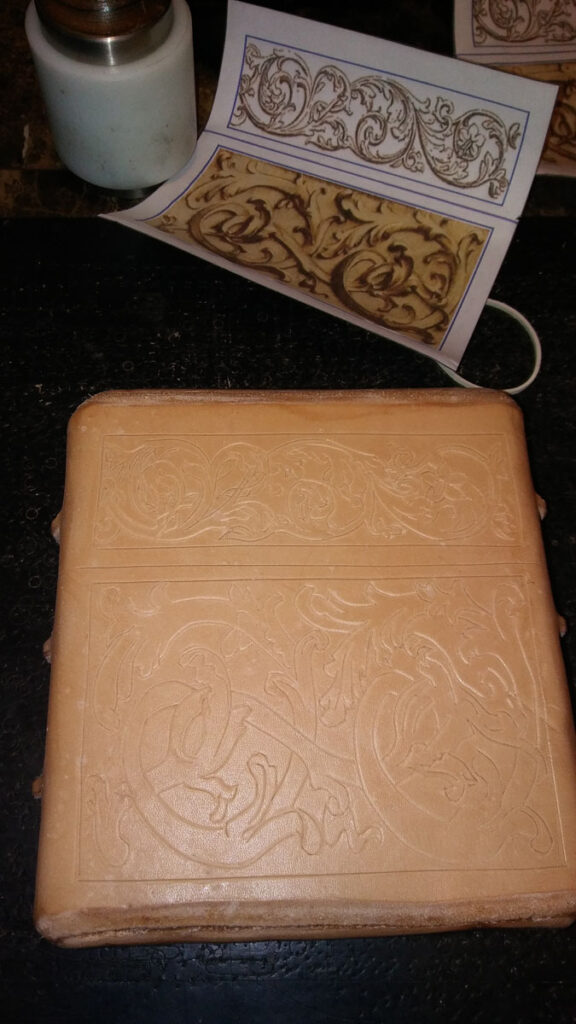
Once the glue had set, I dampened the leather back down a bit in order to do the tooling. With the leather on the form, it was not reacting with mallet driven tooling, so I switched over to utilizing a modelling spoon to do the majority of the embossing. The addition of moisture back into the leather also caused some shifting of the leather on the form, so I moved it back in place and tied it back down.
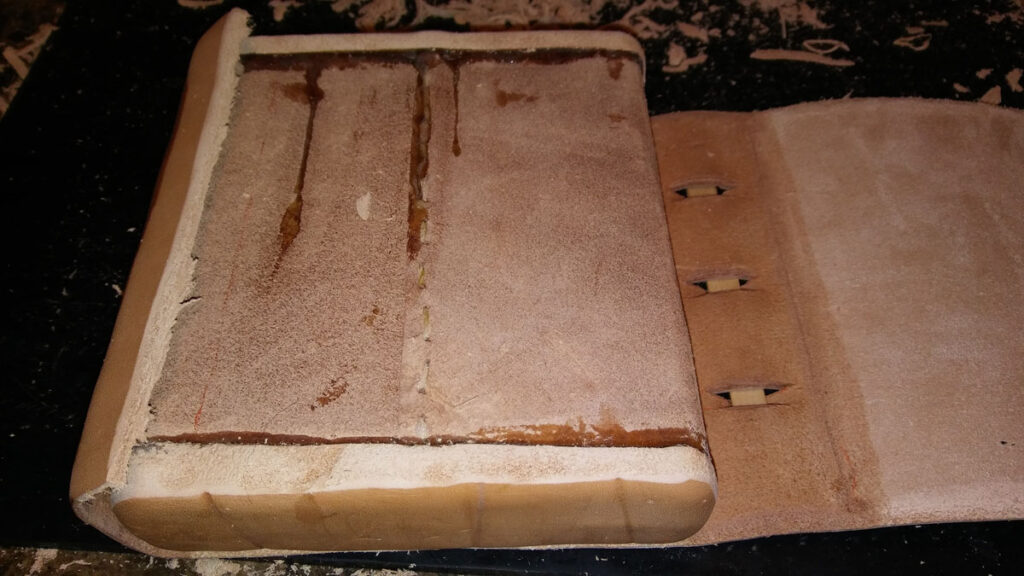
After the case had set for a couple of days, I began to cut the case from the form. It was at this point that I realized that I’d forgotten to put any barrier between the liner and the form – and some of the glue did work its way through the seams as it set. I managed to get the top cut off, but had to destroy the mold in the process of getting the bottom cut off. Once the form was cut about half way apart, the liner slipped free (90+ degree day that was very humid) and I was able to coax the pieces back together.
Once the glue had set back up again, I applied some walnut dye that I had made to the case, buffing the dye out and applying a conditioner based of wax and lanolin. The case was then buffed out again using a piece of wool and left to set for a couple days. When the case had fully cured, I created an inner liner with a slight overlap for the lid to slide over, and I made a strap from the same split leather so that it would match, though conjecture would indicate that it was more likely to have been cord utilized to hang the case from.


Sources and References
The British Museum
- Book Case, Museum Number 1868,0627.2 (printout attached)
http://www.britishmuseum.org/research/collection_online/collection_object_details.aspx?assetId=309281001&objectId=50270&partId=1
Case of molded leather, for a book. Decoration front and back is embossed, modelled, tooled and stamped; foliate scrolls, human figures and coats of arms: Aldobrandini; crest. - Knife Sheath, Museum Number 1897,0717.1 (printout attached)
http://www.britishmuseum.org/research/collection_online/collection_object_details.aspx?assetId=1148128001&objectId=39493&partId=1
Cuir-bouilli case with two handles for carrying cord on either side of case and lid; rectangular in shape with five compartments; design in relief.
The Metropolitan Museum of Art
- Book Box, Accession Number 52.131a,b
http://www.metmuseum.org/art/collection/search/468379?sortBy=Relevance&what=Cuir+bouilli&ft=*&offset=0&rpp=20&pos=16
As featured in The Secular Spirit: Life and Art at the End of the Middle Ages, p 172
The Secular Spirit: Life and Art at the End of the Middle Ages
The Metropolitan Museum of Art, 1975. ISBN 0-87099-096-9. Online viewing available at:
https://books.google.com/books?id=C3_LHs0Ck6gC&printsec=frontcover&hl=en#v=onepage&q&f=false
Excerpts from Pages of interest attached for convenience
Leather and the Warrior by John Waterer.
The Museum of Leathercraft, Northampton, 1975. ISBN 978-0950418216
“Leather and Heat” by Rex Lingwood. Published in The Designer Leatherworker, Vol 1, #2, 1990.
“John Waterer and the ‘Cuir Bouilli’ Confusion” by Rex Lingwood